Showing posts with label cards. Show all posts

Wednesday, December 3, 2008

Not Christmas, but cute just the same

Sorry, no Christmas photos today.  I made cookies, and was going to take a picture of my cookie jar but... we ate a lot of cookies and the jar looks pretty pathetic when it's almost empty!

So, for this evening I'm going to give you card samples from a retired Simply Sent kit.  I've made the cards up, and will give them to a relative for Christmas.  The main card is created using Kraft paper, while the background cardstock is Real Red, Old Olive, and More Mustard.  The inks are the same.


The stamp set was exclusive to the kit.  I still have the set and am willing to sell it - please e-mail me if you're interested!

Happy stamping!

Sunday, November 30, 2008

My Christmas card - I made a bunch of these.

Today has been awfully busy.  We're supposed to be getting some snow tonight, so I wanted to have all of my outside garland hanging on the railings before the snow started to fall.  But first... I had to take all of the lights off of the garland, and replace them with LEDs.  6 strands of lights.  It took awhile, but it's done. 

We also went tree shopping this morning.  My husband loves his real tree smell, so we found a really nice one this morning.  It's in the tree stand, soaking up water, loosening its branches, and leaning rather awkwardly.  We're going to be straightening it before bed.  A couple of years ago it fell over (thankfully before everything was on!) and I'd rather avoid a repeat of that!

I've spent the evening on my blog.  Not this one, the other one.  I'm in the process of upgrading my blog to improve functionality, but you won't see the final product for a bit.  Stay tuned...  

Tonight I give you a photo of our 2008 Christmas cards.  This is not my original design, but I can't give credit to the person who designed the card.  It was received in a card swap in Burlington, and didn't have any identifying information on it.  If you know who the designer is, please tell me so that I can give them credit!!

Until tomorrow... happy stamping! 

Saturday, November 29, 2008

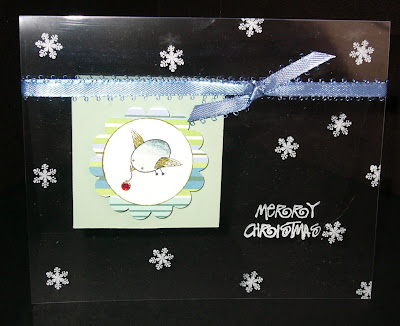
My first Christmas card!!

I took a pile of pictures yesterday, and will try and post them in the next day or two.  My house is looking rather pathetic right now as it's half decorated, and a total mess.  We're going to get our tree tomorrow morning, so it will get worse before it gets better as there will be needles in a path between the front door and the living room.  

So, rather than decorate, I'm blogging!  This card came from one of my stamp club members - Trina Ament.  She stamped the snowflakes and the sentiment on acetate, and then added a very cute stamped bird on the front.  The sentiment is stamped on the paper inside the card, and you can't see any adhesive.  I LOVE it!!!


My Christmas cards are finished (well, except for the fact that I still have to write all of them!), and I will post a pic of this year's card this week.  I'm also going to post pics of some of the handmade cards that I receive this holiday season.  I love it when I receive handmade cards, and want to show them off!!!

Happy Decorating!

Tuesday, November 25, 2008

A Christmas card from 2007...

I'm currently going through iPhoto, looking for my 150 photos that I want to upload to Kodak before the end of the week (150 photos for $15!), when I found this picture.  The card was made last year, for my son's kindergarten teacher.  


It's big!  A full sheet of 8 1/2" x 11" cardstock, folded in half.  You can see the brads in the top - there are additional sheets of white cardstock on the inside, so that each child in the class could print their name.  The card has also been scored just below the brads - can't have the kids destroying the card before it gets to the teacher!

The stamps are from It's Snow Time, a retired set but not one that I will easily part with.  The sentiment came from Hugs and Wishes (current).  The base of the card is Brilliant Blue, and the snow was created using Bashful Blue.  

I'm in the process of trying to put up some Christmas decor in my house, as well as finish my Christmas cards.  I'll post some fun pics of current projects once I take them, and they actually come out well!!!  I've got pictures in my iPhoto, but they are either too washed out, or too dark.  I can hardly wait to get my hands on my new digital camera on Christmas morning!

Enjoy!

Friday, November 21, 2008

Clamming around at the Stack

For those of you that have been following my posts over the last couple of days, you'll know that this is the third Stamp-A-Stack card that I'm posting.  I'm going to post a couple of photos of it to ensure that you see how it was constructed.  Full credit for this card goes to Jennifer Tinline - I love this card!!


The main background is Real Red.  This caused me quite a bit of consternation in the days leading up to the Stamp-a-Stack as the paper was on backorder, and I wasn't sure if it was going to arrive in time!!  In the end, I did have the paper and was infinitely grateful that it showed up!  I used Baja Breeze for the inside, as well as some Baja Breeze Prints Designer Series Paper for the front panel.  Mr. Christmas Clam was stamped in Basic Black, on some wonderful Shimmery White paper.  He's layered on Real Red and Chocolate Chip cardstock.  A piece of Real Red grosgrain ribbon adds a nice touch.  He was coloured using markers and blender pens.

Until tomorrow... happy stamping!  

Thursday, November 20, 2008

More Stamping & Stacking

Bonjour again!

Welcome to the second of the of the cards that we made at our Christmas stamp-a-stack.  This one is super easy!!! 


All of the stamps on this card come from the Snow Swirled set.  I have used Old Olive as the main card base, and then added layers of Elegant Eggplant and Whisper White.  The largest snowflake is stamped using Elegant Eggplant ink, while the second largest snowflake and the sentiment were stamped in Night of Navy.  The smallest snowflake was stamped in Old Olive.  

It's difficult to see, but there are some Dazzling Diamonds in the centres of the snowflakes.

Enjoy! 

Wednesday, November 19, 2008

Stamp-A-Stacking

Hi all!  Wow - it's been 10 days since I've posted anything.  Having a stamp-a-stack and getting a nasty cold will do that to you.  I'm feeling pretty under the weather this afternoon, but this doesn't require a lot of movement on my part, and Michelle is currently engrossed in Cinderella.

These cards are one of the designs that we had at our Stamp-A-Stack.  It's a little more complicated that some of the other cards that were there, but everyone seemed to like the cards.  The stamps used are both current hostess sets - Best Yet and Deer Friends.  I've also used some Holiday Treasures Designer Series Paper, and some Riding Hood Red & Baja Breeze cardstock and ribbon.

The card is designed and punched in such a way that when you open up the card, you can still see the deer/tree as they are adhered to the inside of the card.  

Stay tuned for tomorrow when you'll get to see another one of our stack cards.  And you really will because I'm about to write tomorrow's post!

Wednesday, November 5, 2008

A wonderful RAK!

I recently received this RAK card from a demonstrator (Laura Robinson) who is three levels above me in my Stampin' Up! demonstrator line.  I LOVE the c0lours on the card, and I love the opening!!!  She used her Big Shot and Top Note Bigz die to cut the More Mustard cardstock, and then added an image from the Flowers for all Seasons set, and a sentiment from the Garden Whimsy set.  The best part of all?  Laura used her Curvy Label punch to punch out the image, co-ordinating it with the card!! 


Thanks Laura for a gorgeous card!!!  I love it!

Tuesday, November 4, 2008

A Fall Flair Thank-You

I was at a fun workshop a week ago, and we made this nice fall Thank-You card using the very cool chalkboard technique.  

Because we're in the middle of the fall, I thought that I would try the chalkboard technique on Chocolate Chip cardstock, using Whisper White craft ink and some Earth Elements paper.  I love the look of the colour on the Chocolate Chip cardstock!!!  My only regret is that I don't have the Very Vanilla craft ink as it would have looked stunning against the cardstock.  I need to add that to my list of "needs".


The stamps used on the card are from the Fall Flair hostess set, and the sentiment is from Wonderful words (stamped in Chocolate Chip).  I added a little bit of hemp twine to help with the rustic feel of the card.

Enjoy!!

Friday, October 24, 2008

Birthday Party Invite - Hallowe'en Style!

One of my friends sent me these really cute pictures the other day.  Her daughter's birthday is on Hallowe'en, and they wanted to make some invitations to her upcoming party.

Karen and Emily used the Batty for You stamp set, along with some black embossing powder to make the images on the front of the invite.   They added some very cool Hallowe'een paper, and a great sentiment on the front of the card.  


On the inside, they added another Batty for You image, and all of the party particulars.  I love how the invite opens from bottom to top!  


Very cute invitations!!!  Thanks for sharing Karen and Emily!!!

Happy stamping everyone!

Wednesday, October 22, 2008

A Happy Housewarming card for a friend

One of my top-secret projects last week was the creation of this card.  A good friend of mine (as well as a demo in my downline!) recently moved into her house.  I thought that a card using the Neighbourhood wheel was in order.  

I wheeled some houses onto some Confetti White cardstock (which I love because it's thicker and sturdier than Whisper White).  Using some snips, I cut around the houses and coloured them using my blender pens.  I initially tried to colour them using an Aqua Painter, but I need loads of practice with one of those before I can actually send off a watercoloured card!!!  The main card is constructed using Bordering Blue.  This is where I got stuck.  I don't have any ribbon that goes with Bordering Blue.  So, I went searching online for colours that go well with the blue and was surprised when I found that Kiwi Kiss is a pretty interesting match. 

 The sentiment was stamped in Basic Black Craft ink, and I added a small doodle beneath.  I really need to find me a good "welcome to your new home" stamp.  Hmmm... a trip through the catty may be in order...

Happy stamping!


Tuesday, October 21, 2008

One more "it didn't make the cut" card.

This card will look familiar because you've seen a version of it before!  This is a slightly different version of a card that we made at the Demonstrator Mega-Meeting that was held in September.  The background of the card has been changed from Old Olive to Mellow Moss, a strip of Riding Hood Red Prints Designer Series Paper has been added, the ribbon is now Chocolate Chip grosgrain, and I've changed the sentiment.


We liked this card but... we already have two cards for the stack that have a bit of colouring in them.  Corrie and I thought that if we had three we'd be pushing our luck! 

Happy stamping!

Sunday, October 19, 2008

Another secret is left on the table...

Here is the second of the cards that didn't make the Stamp-A-Stack cut.  It almost did, but our friends swayed us into changing the card to a different design.


The main card is made using Whisper White cardstock.  A strip of Riding Hood Red cardstock has been punched using the Scallop Edge punch.  It has been adhered just underneath the Designer Series Paper from Holiday Treasures.  The main image was stamped in Riding Hood Red ink.  The image comes from the Season of Joy stamp set - one of my favourites!  It has been mounted on Old Olive and Riding Hood Red cardstock.  The gorgeous ribbon is Riding Hood Red Taffeta ribbon.  I love the white edging on this ribbon!!

Enjoy!


Saturday, October 18, 2008

Top secret no longer

Corrie Birnbaum and I sat down last night to finalize the Stamp-A-Stack cards.  We had a little help from our scrapping friends, and I think that we have some really nice cards for the stack!  What do they look like?  Well, you'll just have to come and see!

There's still room if you (and a friend!) would like to come.  E-mail me at littleinklings@rogers.com or call at 905-655-9347 to sign up!  It's only $25, you'll be stamping in a room with lots of windows and friends, and you'll leave with 12 designer Christmas cards to give to those special people in your life!  

I'll give you a couple of small hints of what's to come:

... one of the cards has snowflakes 
... another uses Holiday Treasures Designer Series Paper
... two have some colouring (bring your blender pens!) 

Here's one the cards that didn't make the cut.  I CASE'd the card from one that I saw on Splitcoaststampers created by Julie Monroe.  You can see the original card here.  


I've changed the card slightly, but I still love the look of it.  It would look lovely with some sparkle added, or maybe some Iridescent Ice embossing powder.  The main card has been made using Brocade Blue cardstock.  I have cut/punched the middle layer in Night of Navy, and the Snowflakes from Snow Swirled have been stamped in Brocade Blue and Night of Navy ink on Whisper White cardstock.

Enjoy!

Thursday, October 9, 2008

One of my Favourite Friends

So... who is one of my favourite friends?  Why it's the crab from Crab & Company!  

This cute card is for the friend of one of my boys.  Joshie's birthday party is coming up fast, and he needs a cute card because he's a pretty cute kid!  I hope he likes this one - the crab spins!!!  He reminds me a bit of Mr. Krabbs from SpongeBob.  He's even attached to pennies.  For those of you that have ever watched the mighty Sponge, you'll know that Mr. Krabbs is obsessed with the almighty buck.  


Crab & Company is one of the sets that is on sale this month.  He's a great set to have because he comes with a Santa hat and Christmas sentiments too!

Happy stamping - and spinning!

Tuesday, October 7, 2008

It's Birthday Central in Stampingland

I've spent my evening making fairly simple cards because I'm in the middle of prime birthday season.  It seems as though a lot of our family/friend birthdays fall in a fairly short period of time, and this is it!

My sister's birthday is near the end of October.  Her card was created using the Party Hearty set (currently on sale at 20% off if you spend $20!), and the On Your Birthday sentiment set.  Colours you ask?  Tangerine Tango and Pacific Point.  The hats were stamped off once before being stamped on the card because Pacific Point is quite a strong colour and I didn't want them to overwhelm the card.  
 

My mom's birthday is this weekend.  I saw a version of this card at our recent Mega-Meeting, and thought that I would recreate the swirls and flowers from Priceless.  I added some striped grosgrain ribbon, a sentiment from On Your Birthday, and some Dazzling Diamonds for good measure.  Colours on this card are Bashful Blue and Pixie Pink.


Tomorrow's card features one of my favourite friends... watch for it!

Happy Stamping!

Monday, September 22, 2008

An extremely cute (and easy!) baby card

Today's offering is a card that my stamp club will be creating this week.  I saw the original on Corrine Sommerville's blog, and LOVED it!  So, I thought that it would be a good card for my stamp club to have fun with.  


I have used Pink Pirouette paper for the body of this card (as well as the sentiment), along with Bella Rose paper for inside the scallop.  The sentiment is from Say It with Scallops.  This set is this year's Ronald McDonald House set for 2008-2009.  Stampin' Up! will donate $2 from the sale of each set to Ronald McDonald House Charities.  The sentiment is embossed using White embossing powder, and has been punched using the new square scallop punch.  I have also inked the edges of the square, and added some Stampin' Dimensionals to the back.

The 2" circle at the top was cut out using my CM circle cutters (I know!  They're not SU!  But I've had them for three years now...).  I also punched a small hole on each side of the semi-circle, and fed some Whisper White grosgrain ribbon through.  

What a cute card!!!  And sooooo easy to make.

Just as an FYI... my Monday stamp club for the next group is completely full.  The Thursday group has 5 confirmed members, and 2 "I'm almost sure" members.  So, there's really only one for sure spot left.  If you want it, let me know.  Quickly!  The next round of stamp club begins in late November, but you definitely want to confirm your spot now.

Happy stamping!

Sunday, September 21, 2008

Big Shot Scallop Circle Cards

I was trolling through some of my favourite blogs last week and came across Scallop cards in Corrine Somerville's blog.  She had made some scallop style cards using her Big Shot, so I just had to give it a try!  I made 4 of them on Friday evening, of which I've already posted one (Michelle's birthday card).  Here's the second!


I made two of these cards, with slightly different colour combinations for the centre flowers.  Corrine has a great demonstration on her blog on how to cut these cards, but here's the basics.  Take a piece of 8 1/2" x 11" cardstock and cut it in half.  Fold one half in two, and line it up with the scallop die ($23.95) for the Big Shot.  The key is to ensure that 5-6 of the scallops are visible, on the edge with the fold (ie. don't cover the entire scallop die with your cardstock).  You can then run the die through the Big Shot and it easily cuts through both layers.  This card was made using Not Quite Navy cardstock.  

Using my Creative Memories circle cutters, I cut a 3 1/2" circle for the centre of the card using one of the papers in the Maine Blueberry DSP.  Corrine has this on one of her blog cards and I loved the look.  The flowers on my card were cut using the Flower Layers die ($18.95).  I cut the flowers three times, in Old Olive, Not Quite Navy and Bashful Blue, and ended up with three full sets of flowers that I could then layer in a multitude of colour combinations.  A half pearl from the Pretties kit was added to the centre, and I added some Old Olive ribbon to the top.  I haven't added any sentiments to the card because... I'm not sure who's getting it.  When I made this card I was really just playing with my Big Shot, and having fun.  There's lots more that could be added - if I find the time...

The full list of available Sizzix dies will be available in the Stampin' Up! Holiday Mini catalogue on October 1st.   The dies and Big Shot are available NOW!  If you would like to purchase any of the dies, or the Big Shot itself, give me a call, drop me an e-mail, or try our convenient Online Ordering!!!

Happy stamping!

Monday, September 15, 2008

More Mega-Meeting Cards

I hope you enjoyed the swap cards that I posted yesterday.  Today I am posting photos of the six cards that we all created at the meeting on Saturday.  

First up is a very cute card that uses the birds from Zoofari.  I have made cards before using this card recipe (4 rectangles with a square in the centre) and have found them to be easy and effective.  This card uses Pink Pirouette and Baja Breeze ink and paper.  The birds have been coloured using ink refills and blender pens, and the centre square is actually a small card attached to the front of the larger card.  The feather adds a unique touch.

This card was stamped using the Upsy Daisy set.  The colours used are More Mustard and Really Rust.  The frame was die cut using the Big Shot and the Top Note Bigz Die (one of our exclusive Stampin' Up! dies for the Big Shot).  I'd love to say that I stamped this one but...  I completely forgot to stamp one of my cards and this was the one!  Colleen and Jennifer Tinline kindly put this one together for me.
 

The main image on this card was stamped using the Christmas stamp from a Flower for all Seasons.  This is a great set for those that are just beginning to colour images.  They are all fairly small, and easy to colour. 


I LOVE the simplicity of this card.  I think it's going to be one of my workshop cards for the next couple of months.  The colours are Night of Navy, and Whisper White.  The centre is Silver cardstock, and the images have been embossed using silver detail embossing powder.  Very elegant.


Pink and black are two colours that are outstanding together.  The butterflies are from the new Flight of the Butterfly set, which uses the 2-step stamping method.  It is quite easy to match the outlines to the main butterfly below.  

 
Inspired by Nature is a set that contains 2 large images, and 2 sentiments.  We stamped the grass in Kiwi Kiss, and then overlaid the flowers in Chocolate Chip.  A simply but striking card.


We had a lot of fun stamping and chatting.  If you would like to attend the next mega-meeting, you need to become a demonstrator.  E-mail me at littleinklings@rogers.com or give me a call at 905-655-9347 to chat about it further.  

Happy stamping!

Sunday, September 14, 2008

Mega-Meeting swaps

Yesterday was a very busy, but very fun day.  I was at Laura Robinson's Mega-Meeting, along with 90 other Stampin' Up! Demonstrators.  We swapped cards, made cards, watched some awesome WOW presentations, and caught up on the news with other demos in Laura's downline.
I made 40 swap cards, and was able to trade all of them with other demos.  In addition, I picked up 16 cards from Jennifer Tinline's shoebox swap that was held at the end of August.  There were some terrific cards in my basket at the end of the afternoon!

My swap card is based on a card that I created for my holiday Stamp-A-Stack last Christmas.  I've changed the colours and the stamps on the "ornaments" (last year's card was created using Always Artichoke & Red Rose).  The snowflakes are from Season of Joy, and the sentiment is from Wonderful Words.  The colours are Brilliant Blue, Bashful Blue, and Whisper White.  The silver cord isn't available now... but it will be in October when the elastic cord returns to the Holiday Mini Catalogue.


I have added some of the cards created by members of my downline.  Sharon Zinner created this really cute Christmas card using the Level 2 hostess set Deer Friends, and Heard from the Heart.  I love the chipboard heart that she's added!


This card was created by Colleen Weddell.  It uses Ginormous Flowers, and every colour of ink from our updated In Colour line.  The sentiment is from All Holidays.  An easy card to make with lots of visual impact.


Karen Kane designed this lovely card using Fruit Stand, and Heard from the Heart.  This card is easy to colour, but has a great visual impact.

This adorable Halloween card was made by Dana Aitken, a talented demonstrator under Sharon Zinner.  She used the Batty for You set, along with some Ghostly Greetings Designer Series Paper and Kiwi Kiss Striped Ribbon.  The googly eyes add a great touch!

Finally, a really cute card from demonstrator Karen Green, also part of Sharon's downline. The card features the set Window Dressing, which is a Level 3 hostess set.  Karen did an excellent job watercolouring the card and its background.  I love this card!  I'm sure the fact that I love cats has something to do with it...

Stay tuned for tomorrow's installment of my loony stamping blog.  I'll be posting pics of the cards that we made at the meeting.

Enjoy!