Hope to see you soon!
Wednesday, December 10, 2008
Tuesday, December 9, 2008
Fee Family Fotos
For the last couple of years I have given my mom and mother-in-law small scrapbooks for Christmas. This year they are receiving DVD Tin photo albums instead as I am quickly running out of time to put together scrapbooks, and I want to do some scrappin' of my own!!!

The only thing I need to do at this point is print the photos that will go inside. That's on today's list of things to do... along with some more stamping!
Happy Stamping!
Monday, December 8, 2008
The most adorable Santa box
I had a bunch of kids over on Saturday morning for some stamping (although it was more punching than stamping) and we made some cute projects together.

I think the cutest was this Santa box. Another demo had given me a sample for this box, and I had to make it. They are super easy, and great for kids as they involve a lot of punches, and I don't know a child out there that doesn't love the Stampin' Up! punches.
Before we added the cord to these, we put a couple of Hershey Kisses inside - just for a small treat. Yummy!
Happy stamping!
Friday, December 5, 2008
Cookie Time!
Finally... a picture of my cookie jar. It's not even remotely close to being full. In fact, it's looking rather empty - even though there are probably 4 dozen cookies in it!

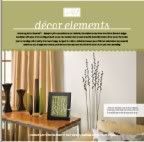
The jar itself came from Wal-Mart. It was less than $20 (before tax) and it is enormous. I've added one of the Decor Elements to the front - Christmas Countdown. I used the small version ($23.95) and it fit perfectly on my jar. The numbers were rubbed onto some Whisper White cardstock, and matted with Real Red cardstock.
After I added my Decor Element, I stamped snowflakes all over the jar using white Staz-On ink. You can only see the small ones (and a hint of a big one on the right side) but there are large and small snowflakes around the entire jar. Which snowflakes you ask? The ones from the Country Living Holiday Stampin' kit. They are very traditional snowflakes, which are my favourite kind. I'm not big on the more modern versions.
Tomorrow's Mom and Me stamping. I'll post pics for all to see!
Happy stamping!
Wednesday, December 3, 2008
Not Christmas, but cute just the same
Sorry, no Christmas photos today. I made cookies, and was going to take a picture of my cookie jar but... we ate a lot of cookies and the jar looks pretty pathetic when it's almost empty!


So, for this evening I'm going to give you card samples from a retired Simply Sent kit. I've made the cards up, and will give them to a relative for Christmas. The main card is created using Kraft paper, while the background cardstock is Real Red, Old Olive, and More Mustard. The inks are the same.
The stamp set was exclusive to the kit. I still have the set and am willing to sell it - please e-mail me if you're interested!
Happy stamping!
Tuesday, December 2, 2008
Playin' with Heat & Stick Powder
Stamp club last month involved a lot of Heat and Stick powder, and a lot of glitter!!! One of the projects that we completed was a gift card holder, complete with glittered snowflakes.


The gift card holder was made using Chocolate Chip cardstock as a base. The dimensions of the paper are 7" x 4 1/4". It was scored at 1 1/2" and 4 1/2". I have added a piece of Ski Slope Designer Series Paper to the front flap. The bottom flap was stamped in Whisper White Craft Ink using the small snowflake from the Country Living Holiday Stampin' Kit. I sprinkled Heat and Stick powder over the snowflakes, and heated the cardstock (but just until the powder melted). I then dipped the paper into my box o' Dazzling Diamonds, shook off the excess, and heated the cardstock again to set the glue. I gave the glue a couple of moments to fully set and cool, and then took a Swiffer cloth to the card to remove the excess glitter (because there was a lot!)
The brads secured the small flap to the card, and I tied a piece of Baja Breeze striped grosgrain ribbon around the flap to secure it. It's tight enough to secure the card, but loose enough that you can slip it on and off. Once the ribbon was tied, I added a Little Felt Flurry to the front, securing it with a Dollarama rhinestone brad.
We finished the evening covered with glitter, which is perfect for the holiday season! Tomorrow is cookie making day. I'm hoping that I can photograph my ginormous stamped cookie jar, complete with cookies!
Happy stamping!
Subscribe to:
Posts (Atom)